Mutual authentication (server & client SSL/HTTPS) with Spring Boot + Tomcat (embedded and standalone)
Background
If you’re using relatively new versions of Spring Boot and Tomcat, configuring a HTTPS server with a client-certificate authentication (mutual authentication) is actually pretty straightforward. The information on how to achieve this, however, is not. So once I figured it out, I thought I’d write it down for future reference and for anyone else looking for a straightforward guide.
Software versions: Spring Boot 1.4, Tomcat 8.5, Firefox 49.
Preknowledge
This guide assumes that you have a basic understanding of / experience with SSL certificates and a working Spring Boot web application.
Part 1: Certificates
Create certificates
Grab your favorite certificate management tool (I use XCA) and create three certificates and private keys (XCA has convenient templates for all three, all I do is change the validity to 10 years and set commonName):
- Certificate Authority (CA) to sign all the others. Export certificate only.
- Server, signed by the CA. Export the key pair (certificate + private key). Make sure the commonName matches the domain name you will be using.
- Client, signed by the CA. Export the key pair.
To avoid certificate warnings/errors, import the CA certificate as a trusted authority in the OS/browser you use.
Create a keystore and a truststore
A keystore is a file used by Java applications, containing certificates and/or private keys. A truststore is another name for the same thing, but used differently. In essence, keystore is meant to hold key pairs (private + certificate), and a truststore is meant to hold only trusted certificates (no keys). Mechanically there’s no difference, they’re both keystores.
For managing keystores, all of the internet resources will tell you to use Java’s “keytool” command line tool. This once again proves that the internet is a dark place full of people who want everyone to suffer. Command line is for automation and GUI-less environments, if you’re working with any kind of desktop OS, grab yourself a copy of KeyStore Explorer and be welcome into the 21st century. Now then:
- Create a new keystore, the format doesn’t matter much (and you can always change it), but the convention is to use JKS for Java-only usage (since it’s Java-specific and propretary) and P12 (PKCS#12) for compatibility with other software. Setting a password (>6 characters) for the keystore is mandatory.
- Import the server key pair, give it a simple name / alias. Password for the key pair is optional.
- Create another new keystore (this will be the truststore).
- Import the CA certificate.
- Save everything.
Part 2: Server-side authentication / HTTPS
When developing Spring Boot applications, you always have two ways to run them: running with the embedded Tomcat server or deploying to a standalone Tomcat server (have not tried with other servers). Each configures a bit differently, but once you have the keystore, it’s all pretty straightforward. For the server to run under HTTPS, all it needs is the configuration to tell it how to access the key pair in the keystore (and you probably want a customized port as well).
Embedded Spring Boot Tomcat
Open (or create) your application.properties resource file and add the following, customizing as necessary:
# HTTPS server port
server.port=8443

# Embedded server runs in the root folder of the project,
# adjust the path / place the file accordingly.
server.ssl.key-store=keystore.p12

# Keystore password (keystore must have a password).
server.ssl.key-store-password=

# Name/alias of the server certificate key pair
server.ssl.key-alias=localhost

# Password of the server key pair. Password can be blank.
server.ssl.key-password=
And that’s it. Run the app and it should start a HTTPS server on 8443 port.
Standalone Tomcat
Open Tomcat’s conf/server.xml among the other connectors, add this, adjusting as necessary:
<Connector port="8443" protocol="HTTP/1.1" SSLEnabled="true">
  <SSLHostConfig>
    <Certificate certificateKeystoreFile="conf/keystore.jks"
                 certificateKeystorePassword="accounts-api"
                 certificateKeyPassword=""
                 certificateKeyAlias="localhost" />
  </SSLHostConfig>
</Connector>
And you’re done. Restart Tomcat server and it should be serving a HTTPS on port 8443.
Part 3: Client-side authentication
In order to use a client certificate, the client needs to send one, and the server needs to accept. In order for the server to accept a certificate, the server must trust either the certificate itself, or the CA that issued/signed it. We already imported the CA certificate into the truststore, now we just need to configure the servers to know where it is and use it.
Embedded Spring Boot Tomcat
Open application.properties resource file and add the following, customizing as necessary:
# Requires client authentication.
# You can also use "want" to request it but
# allow to see the page without it.
server.ssl.client-auth=need

# Truststore file
server.ssl.trust-store=truststore.jks

# Truststore password
server.ssl.trust-store-password=
Standalone Tomcat
Open Tomcat’s conf/server.xml, find the Connector that you configured and add additional parameters to the SSLHostConfig element that tell Tomcat where to find the truststore, and to verify client certificates:
<Connector port="8443" protocol="HTTP/1.1" SSLEnabled="true">
  <SSLHostConfig truststoreFile="conf/truststore.jks"
                 truststorePassword="accounts-api"
                 certificateVerification="true">
    <Certificate certificateKeystoreFile="conf/keystore.jks"
                 certificateKeystorePassword="accounts-api"
                 certificateKeyPassword=""
                 certificateKeyAlias="localhost" />
  </SSLHostConfig>
</Connector>
Client side
Now that the server knows to ask for a client certificate and which CA to accept them from, all that’s left is to actually send it. Most of the time the client certificate is sent by software programmatically, but to simply test that it works, we’ll use the browser. Unfortunately, setting up a client certificate varies quite a bit depending on OS and browser. The simplest way for a quick test is to use Firefox — it manages its own certificates and is therefore consistent across different systems.
- Open Firefox, go to Options -> Advanced -> Certificates -> View Certificates
- Under “Your Certificates” tab, import the client key pair.
Done
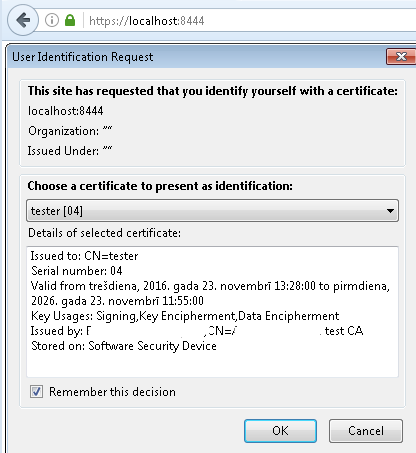
And that’s it. You should now have a working mutual authentication for your Spring Boot / Tomcat application. When you connect to the website, Firefox should pop up a window letting you select a certificate to authenticate with.
Leave a Reply